
Introduction
A few months ago, I needed to print some ID Cards, but local vendors quoted me a hefty S$10 per card, a price I wasn’t willing to pay for just a couple of cards. I then ventured down a rabbit hole of DIY card printing, which resulted in a surprisingly efficient and low-cost solution.
A friend introduced me to the idea of leveraging the CD/DVD printing capabilities of his Epson L805 printer for printing ID cards. The trick was to use specially coated PVC cards and a unique aftermarket tray that tricked the printer into treating these cards as CD/DVDs. But, my friend’s printer hadn’t been used for a long time and gave me a color issue. So, I embarked on a quest to find a low-cost ID card printer.
Experimenting with different brands, I tried the Canon Pixma 1020. It required no special tray and simply used the rear feed for the PVC ID cards. However, the downside was that it could only handle 20mil cards, not the typical CR80 specification 30mil cards that could embed a chip, like RFID or NFC.
Just as I was on the verge of abandoning this project, Epson decided to capture this market of modified trays and released their printers with official ID card printing trays, the L8050 (A4) and L18050 (A3). I snapped up the L8050 at launch for S$580. Although the printer came with its tray, I had to source the special inkjet adhesive coated cards separately. After extensive trial and error, I discovered Brainstorm ID supplied the most consistent cards, while providing top notch and friendly support. Many cards I purchased from AliExpress had issues with ink setting.
Card Stickiness
Printed inkjet cards feel sticky to the touch due to how they are coated to absorb the ink. Brainstorm ID sells 2 mil Clear Overlays to be pasted over the cards to protect them and negate the stickiness, but since I have a Cricut Maker 3, I ended up getting glossy cold laminate and cutting them to CR80 size, then pasting it over both sides to make it feel nice and smooth.
Real World Usage
This setup was particularly useful when I recently had to provision cards for an event with over 300 participants. Each attendee received an NFC-enabled ID card to interact with others. A local supplier quoted us S$11 per card, but with self-printing, given Brainstorm ID sells printable PVC ID cards with NFC NTAG215 embedded, it cost a maximum of S$2 per card. We decided to print the cards ourselves, unaware of the slow pace of the process.
Printing the cards double-sided, drying, and laminating required a significant amount of time. We had to address issues like ink staining and laminate misalignments, which necessitated reprints. A significant challenge was the time-consuming drying process and managing the print flow effectively. We eventually established a system that allowed simultaneous printing and drying of the cards.
Print Process
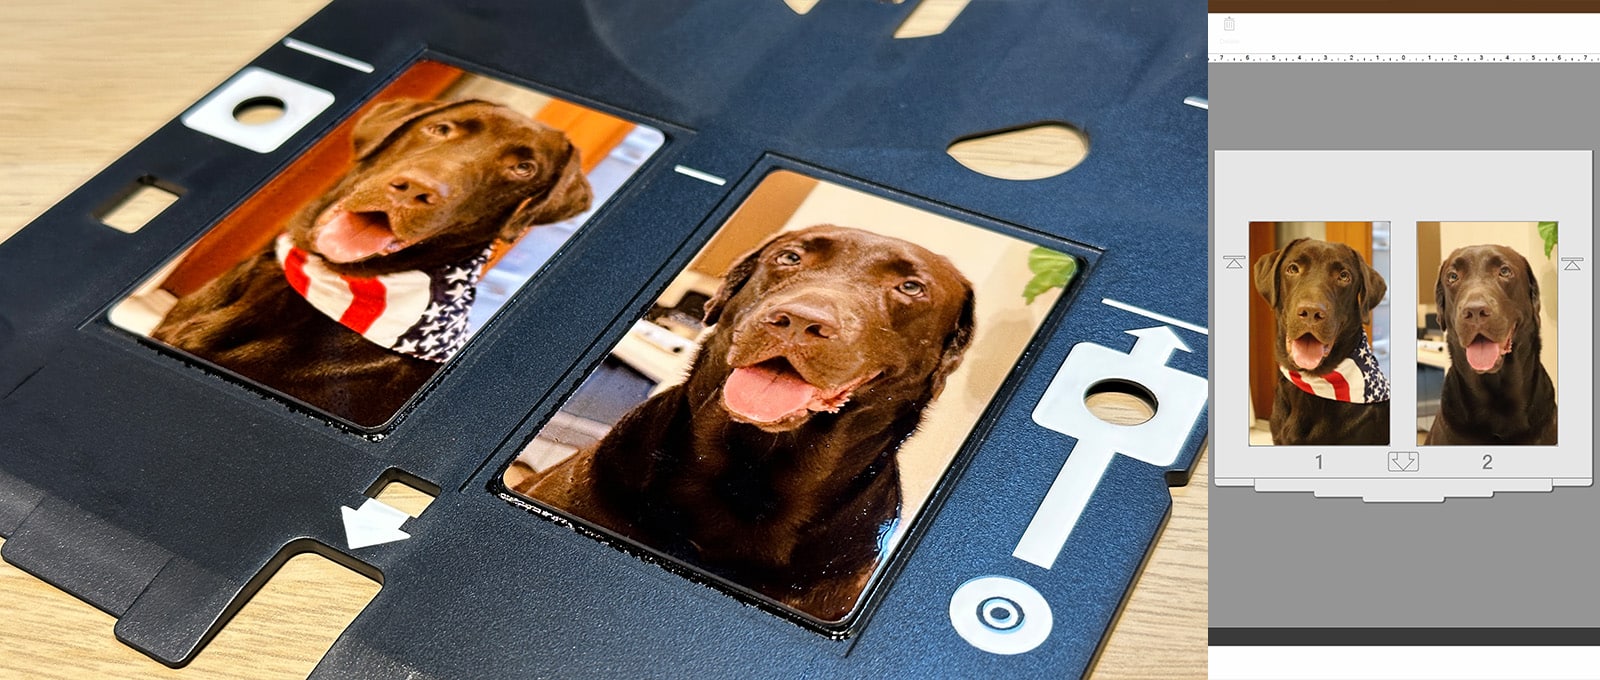
In our project, the double-sided cards had different fronts but the same design on the backs. Because it takes a while for the ink to dry, we started the printing in the pattern:
[Front-001] [Back-001]
[Front-002] [Back-002]
[Front-003] [Back-003]
Now, we have 3 fronts without backs and 3 backs without fronts, out on the table to dry. We then flip the cards around and print the fronts onto the backs, ad the backs onto the fronts:
[Front-004 onto Back-001] [Back-004 onto Front-001]
[Front-005 onto Back-002] [Back-005 onto Front-002]
[Front-006 onto Back-003] [Back-006 onto Front-003]
and so on.
This way, we always had the cards drying two cards ahead and could effectively output two cards at once, while only needing to replace the front image in the print job within Epson’s software.
Ink Overflow Issue
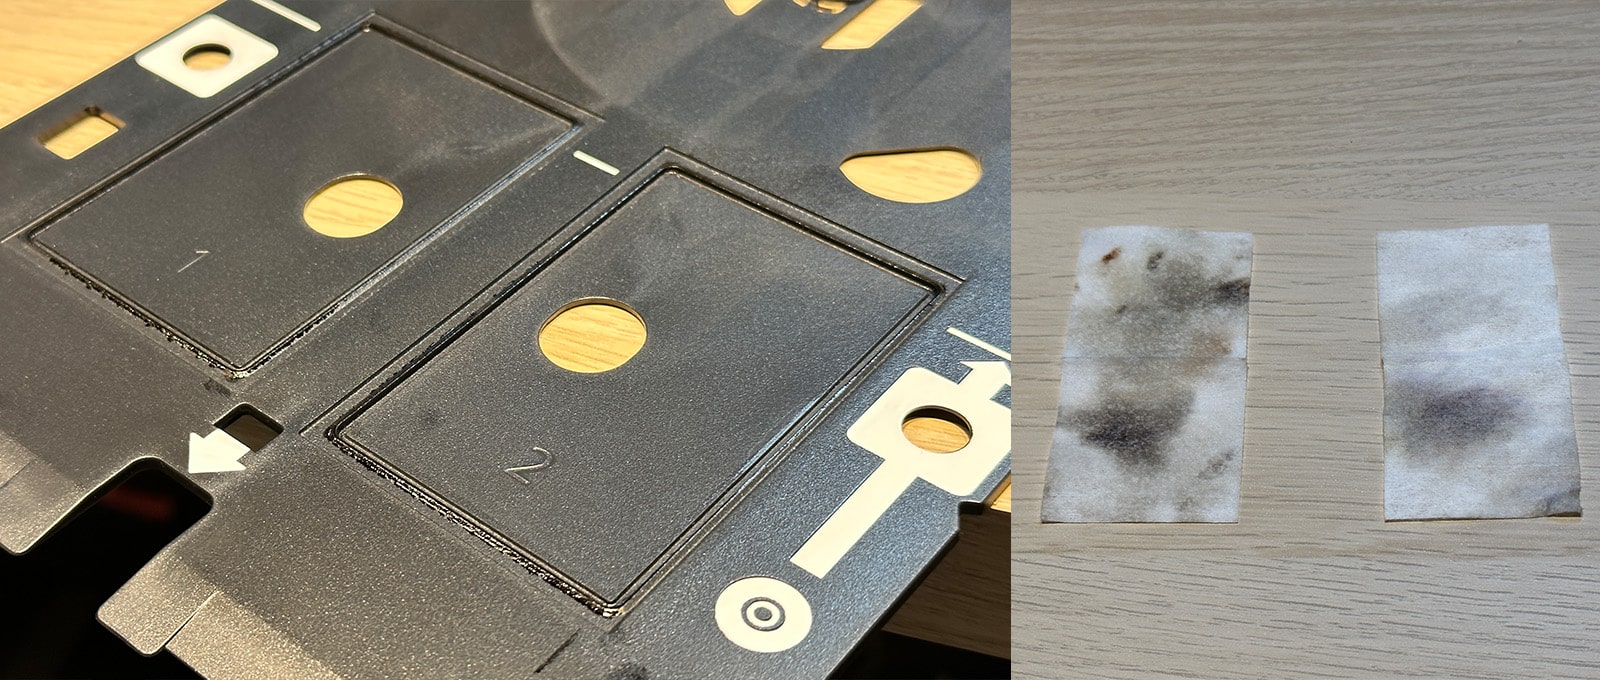
Another major bottleneck was the ink overflow on the tray. The tray has significant leeway for the card to sit on. Therefore, Epson’s print software Photo+ prints out a significant amount of bleed to account for it. This causes ink to be printed onto the tray itself, outside the boundaries of the card holder. While this is expected, the margins that Epson had set were overly generous. After each print, we had to clean the tray repeatedly using alcohol wipes and dry it quickly using tissues before loading the next two cards.
This added significant time to the work and was our largest bottleneck. We had two fixes for this. I contacted Epson and found that we could buy replacement trays at S$4.50 each. This allowed multiple people to assist in the workflow by having two others cleaning trays while one was being used, so there was always a clean tray ready to be loaded.
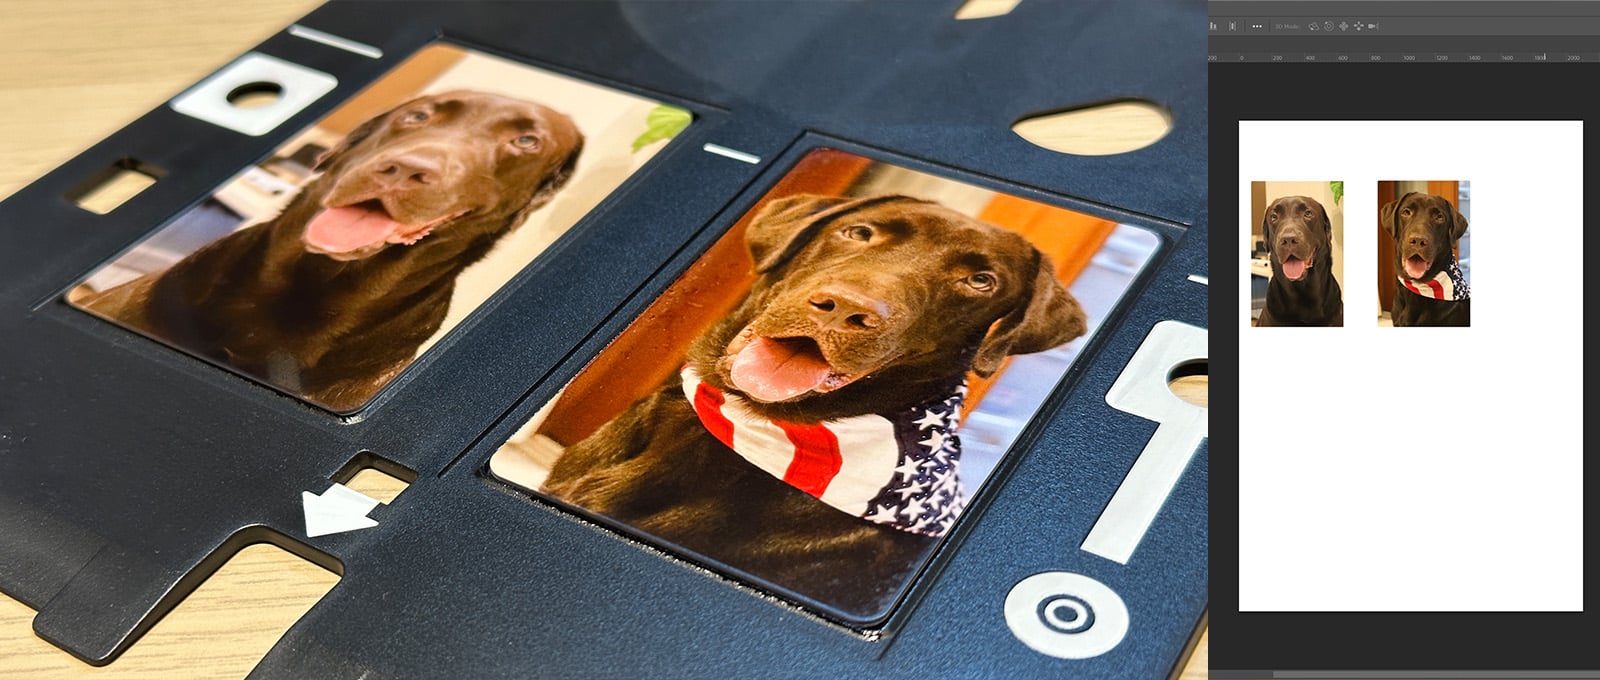
Still not an ideal solution, given the amount of cleaning supplies we were using up. So, I wanted to see if it were possible to create a Photoshop template much like previous unofficial methods and bypass Epson Photo+ altogether. I downloaded a software called Cobra Print Viewer which allowed me to export the print job to a JPEG file, which I converted into a Photoshop template. After a lot of test prints and calibration, I finally created one with much more reasonable margins. This brought the amount of ink being printed on the tray to a bare minimum, to the point that the tissues or alcohol swabs could be reused several times, and sometimes not at all. Having the Photoshop template was a bonus, because we then used Photoshop’s batch functions to automatically generate all the print jobs and queue them.
[DOWNLOAD THE PHOTOSHOP TEMPLATE HERE]
Black Ink Smudging
Our final issue was the print quality. The print looks really beautiful and vibrant on the cards until there are areas with too much black ink. The black ink and darker spots don’t dry fast enough and result in smudges into other areas. We fixed this by changing a few settings in Epson’s printing preferences:
[Quiet Mode -> On]
[Thick Paper and Envelopes -> On]
These options make the printer print slower, which gives it even more time to dry.
[Print Density -> -20%]
While this affects the print quality, some color compositions have no choice but to reduce the amount of ink so that it doesn’t smudge. -20% worked for us, but you can go as low as -50%. Trial and error is necessary to find the sweet spot for the job.
Conclusion
In conclusion, while setting up this DIY PVC ID card printing system required substantial initial time and cost investment, the results were highly cost-effective compared to professional services. Despite the workload being more than that of dedicated ID card printers, the significant cost-saving made the endeavor worthwhile. Additionally, with all the troubleshooting completed, future projects should be quicker and smoother.
I would recommend this form of inkjet card printing for those seeking a low-cost alternative to ID card printers. Notably, it can achieve over-the-edge printing. Dedicated ID card printers in the market have two forms, edge-to-edge or over-the-edge. Edge-to-edge printers are the cheaper ones and about S$1,500, but unlike what the name suggests they cannot print borderless and will leave a white border around the print. Over-the-edge printers cost a lot more at around S$5,000 and can print borderless, like this inkjet solution using the Epson L8050.

Hi! Thank you a lot for the information, I wanted to print ID cards in my Epson printer with a Photoshop template and I was so happy to found yours, but I noticed that the dimensions are too big (21.885 in x 31.25 in) for the whole document, are the dimensions correct?
I appreciate your response.
Thank you so much in advance!
They work for me, I’m not entirely sure as I haven’t had to play around with this for a long time now – give it a shot? 😛
How did you manage to print using photoshop? i cant manage it to print on top of the card, what are the coordinates on an A4?
I used a PSD template, it’s linked in the post.
Thank you for this .psd file, it worked beautifully!